Coverage Tree View Tool Window
Clover.NET Coverage Tree View
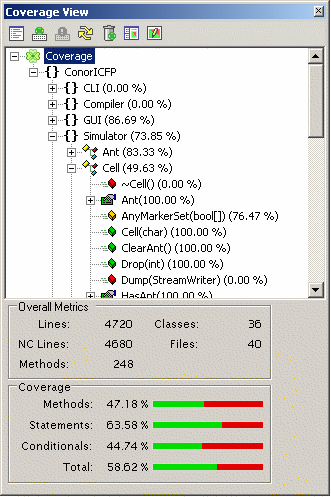
The Coverage Tree View is activated from the View -> Other Windows menu in Visual Studio. An example of the tool window is shown below:
There are three components to the tool window. At the top is the standard Clover toolbar to control Clover.NET operations. This toolbar also appears on the Options tool window and corresponds with the operations in the Clover menu.
The main component of the Coverage View window is the Coverage Tree. This is a namespace tree of your .NET Clovered code. It is similar to the Visual Studio Class View. Each node of the namespace that contains code shows the coverage figure for classes at that node of the namespace hierarchy. It does not include coverage for nodes lower in the hierarchy.
Below the coverage tree is a metrics pane which displays metrics and Coverage information. As you select a node in the coverage tree, this panel will update to show that node's metrics. The metrics pane can show metrics and coverage at the overall, namespace, class and file levels. Not all fields are relevant at all levels.
In the coverage tree, at the method level, the icons displayed for methods are color coded. A green icon means that all statements in the method have been executed, red indicates that the method was not entered and amber means that some of the statements in the method were not executed. You can double click on the class and method nodes in the tree and Clover.NET will bring up the source code for that item in the editor. This makes it easy to navigate around your code from a Coverage point of view and find areas which need attention in your testing strategy.